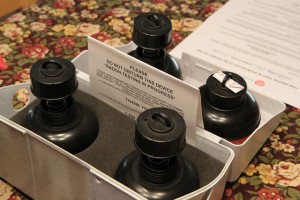
One of the things you hear most from this site is that you should test your home for radon. Since radon is odorless, colorless and tasteless that is – unfortunately – the only way to discover whether or not you have a problem in your home. That said, how do you test? What are the steps required to setup a radon test and collect the appropriate air samples? Are there any tips, pointers or things you need to know beforehand? That’s exactly what we’re going to explore now.
How to Test Your Home for Radon
Follow the Test Directions to a Tee
 Depending on what type of radon test you purcase, you may or may not have a completely different set of instructions. However, the concept will always remain the same – you want to collect an uncontaminated air sample from inside your residence. We’ll get to more on how it can be contaminated later.
Make sure you record the date you start the test along with basic information about where you located the testing kit. Believe it or not, where you place the test is extremely important but again that’s another element we’ll cover later.
How to Prepare to Test Your Home for Radon
Before you setup the testing kit, make sure you leave all windows and doors in the home closed for at least twelve hours. If you open any of them, fresh air can contaminate and affect the results of the test. You want to minimize the amount of air coming into the residence as much as possible. In addition, any fans or ventilation systems pulling air from outside the home should remain off during testing. You also want to avoid testing during extreme weather conditions.
Selecting Your Testing Location
The test should always be placed in the lowest livable space in your home. In some homes that will be in the basement, whereas in others it will be the ground floor. Always keep the testing equipment away from direct sunlight, heat or drafts. That means keep the testing equipment away from windows, outside doors, air vents, fireplaces, and heaters. It’s also a good idea to keep the equipment away from a kitchen, bathroom or laundry room.
Begin the Test
There are different kinds of tests, so yours might differ. For the most part, tests generally include two sample vials or “detectors” which are used to collect air samples.
Remove the two caps from the vials, and place them on a flat surface – as even as possible – at least three feet away from the ground. They must also remain three feet away from any outside wall – this will prevent any drafts from interfering with the test. The two vials should remain six inches apart from each other at all times. How long you leave them depends on what kind of test you purchased – short or long term.
How to Get the Results After You Test Your Home for Radon
Fill Out the Necessary Information
Each testing kit will include a card or form where you will need to include additional information. Make sure to fill out all of the requested information, because it’s essential to the test.
When you put the caps back on top of the air sample vials, make sure you also record the end date for the test. This will allow the laboratory workers to identify how long the test was conducted.
Mail the test equipment to the proper address – it’s always included with the testing kit – along with your payment. The cost will vary depending on the type of test and location where you are sending the sample. The test MUST be mailed within 24 hours after the time you close the vials.
From there, it’s just a waiting game until the lab returns the test results back to you. Of course, there are radon professionals that can perform the test in a much shorter time as well as provide you with local results – some can print the information on site with portable equipment.


