It seems like we lead with this point every time a new story breaks about the deadly gas called radon, but that doesn’t make it any less important. Most tend to overlook just how fatal radon can be. Yet, there’s no way to ignore the fact that it is the second leading cause of lung cancer in the United States. Exposure to the gas has been attributed to about 15,000 – 22,000 lung cancer deaths each year.
Unfortunately, the gas is odorless, colorless and tasteless and there is absolutely no way to detect it without the proper equipment. So, how do you prevent exposure to such a gas? The only surefire way is to test the indoor air quality of a residence or business. This can be done by purchasing testing equipment, detectors similar to a smoke detector, or making your own.
The latter option is far less common. That being said, it is possible to create a radon testing device that works as good – if not better than – a store bought one. Since testing is recommended at least twice a year, owning one may be the most cost efficient option for some – especially in areas where elevated radon levels are common. You see, radon levels can fluctuate greatly throughout the year – seasons, temperatures and geography can all play a role in the concentration of radon in a particular area. That being said, it is important to remember that just because your next door neighbor has safe radon levels within their home does not mean you will. Every home should be tested, regardless of location.
DIY Radon Detector
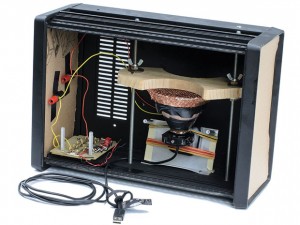
We thought it might interest many of readers to see a tutorial on creating a “homebrew radon detector.”
As the source notes, such a device is actually very easy to put together. Using common materials, or many that you can purchase at a department store for relatively cheap, you can assemble exactly what you need to check the air quality in your residence.
“It turns out that you can make a cheap and effective radon detector with five basic elements: a webcam, a funnel covered with copper tape and mesh, a voltage multiplier built from some basic electrical components, a box, and a computer.”
If you’d like to see the full instructions and tutorial pay a visit to the source over at IEEE Spectrum.
Why Build Your Own a Detector?
Because radon levels can fluctuate so openly, it is a good idea to own a more permanent detection device. If you have one in your residence you can test the air quality on a regular basis. While we recommend at least two tests a year, more can be beneficial in some circumstances.
Detectors are as equally important in locations where mitigation systems have been installed. Just because there is a system in place to lower radon levels does not mean you should overlook monitoring the concentration of the deadly gas. In fact, if anything it should mean the exact opposite – that you should check more often to ensure the system is working.
If you’d like to know more about radon levels, testing or mitigation feel free to use our resources.


